At South Coast Summit, I had the opportunity to speak about what’s new in Field Service in 2021 covering features released as part of waves 1 and 2. The Field Service (FS) Customer Portal was one of the features I was quite excited about, spending a bulk of my time talking about the topic. In preparation for the session I spent some time setting up, playing with and attempting to modify the portal (sometimes being unsuccessful and breaking the portal altogether – remember, the portal is in preview).
In this post, I’ll cover some basics about the FS customer portal along with some of my thoughts, observations and experiences using the portal – If you missed my session at SCS, here’s your chance to read some of what I covered.
Note: I’m going to assume you have a basic-ish understanding of Field Service.
A little background
In case you haven’t already guessed, the FS Customer portal IS a Power Apps Portal-based template with a pre-canned set of configuration records to allow you to quickly get a working portal up and running.
The portal, as it currently stands has two main capabilities – Customer self scheduling and technician tracking
- The customer self scheduling aims to allow end customers to log into the portal, create and schedule work orders for a selected service, all while scheduling the correct resource in real time, taking availablity, skills and distance into consideration.
- The technician tracking capability is a set of pages, configuration and background functionality to send notifications to a customer when a technician selects an applicable status on a booking (such as accepted, travelling, completed, etc). As the name suggests, it also tracks the technician’s movement in near real-time for the customers’ visibility.
Interestingly, the portal started out with the Technician Tracker feature being the sole piece of functionality introduced in the 2021 Wave 1 release. However, between the wave 1 and wave 2 releases, the portal has seen a slew of useful updates – It still has a long way to go though, but its on the right track.
I’ll be covering the customer self scheduling (and related setup) in this post. We’ll save the Technician Tracker stuff for later.
The setup process
Maker Portal
Setting up a Field Service Portal is a surprisingly straightforward process. The Microsoft Docs article page provides a detailed step by step guide on how to set it up, but here’s the TLDR version 👇
- Go to make.powerapps.com > select your environment (please don’t do this in a production environment)
- Select the ‘+ Create’ section
- Under the list of Power Apps templates, search for ‘field service portal’ (or a variation of those words)
- Select it to begin the creation process
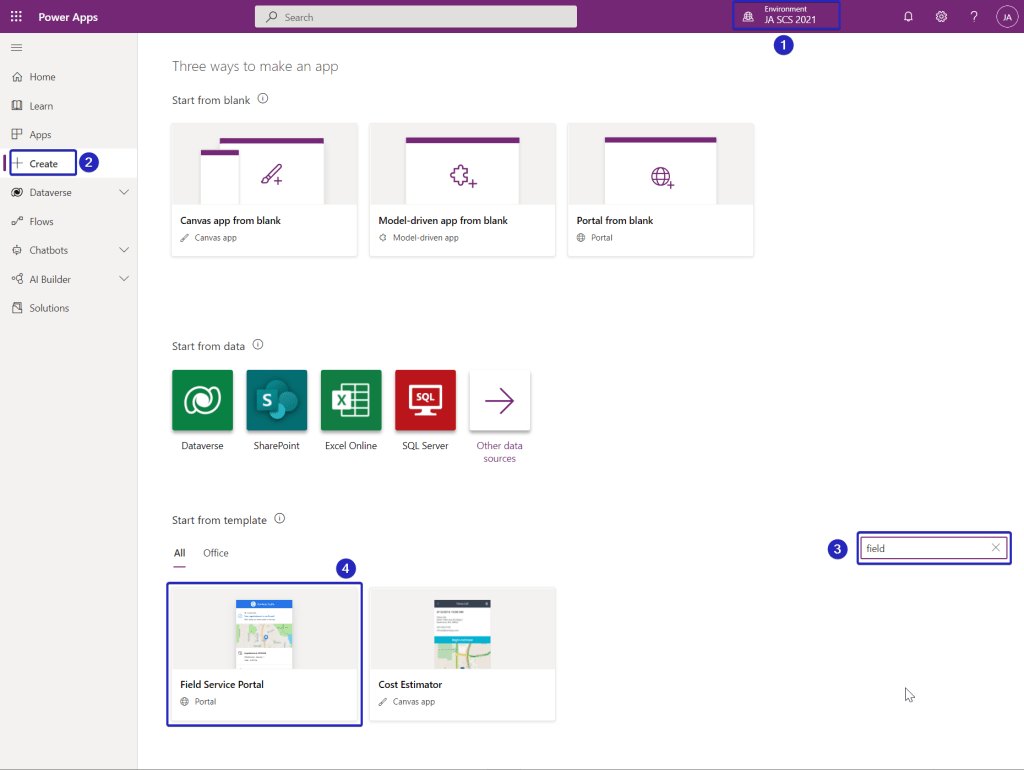
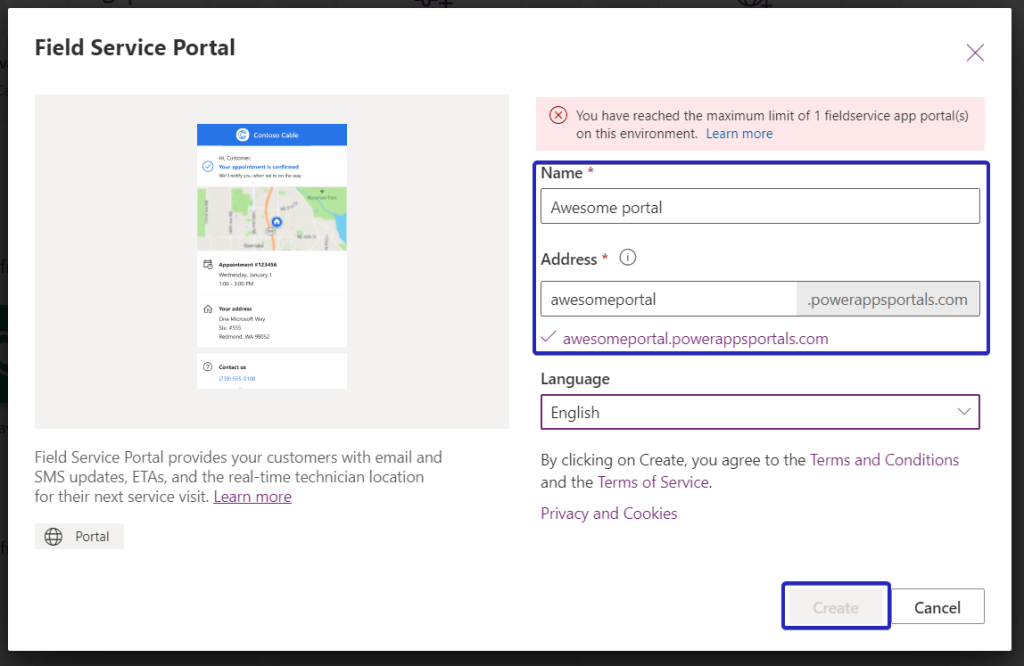
- Provide a portal name and URL > select create.
Portal configuration in Field Service
Once the Portal has been provisioned, you can begin setting up the data to allow the portal work. Head over to the Field Service App and open the single record in the Customer Portal navigation items under the Settings Area. This record contains a few key settings that need to be confirmed/changed in order to make the portal work.

(Configuration) Basic settings 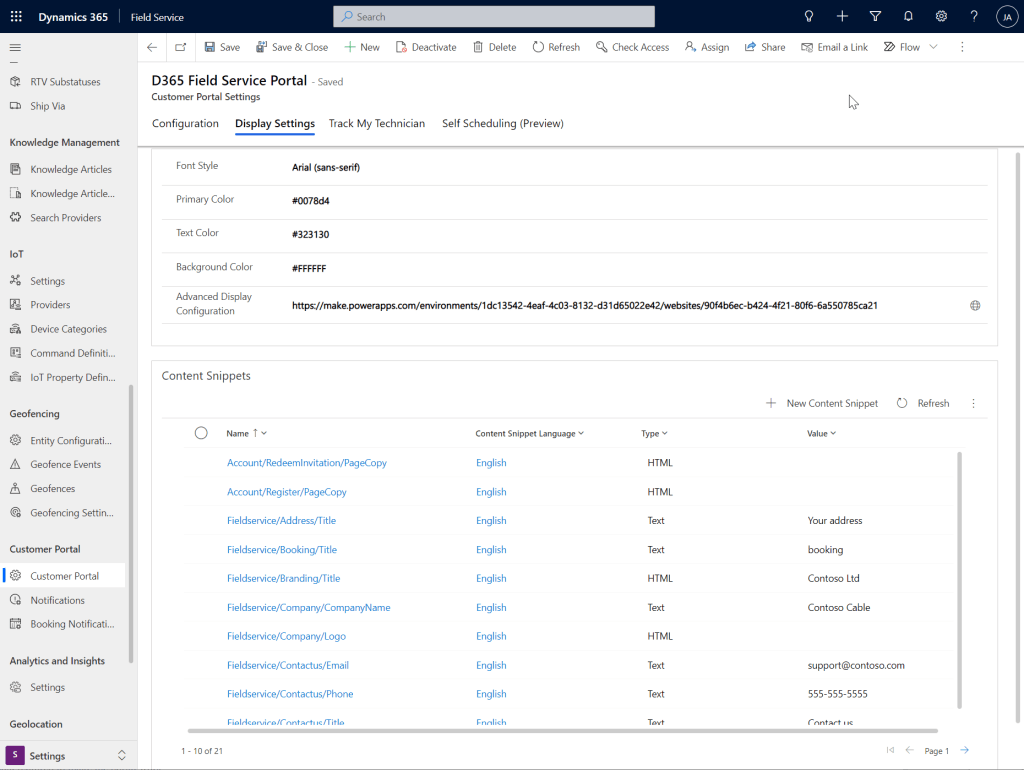
(Display Settings) Portal display and theming options 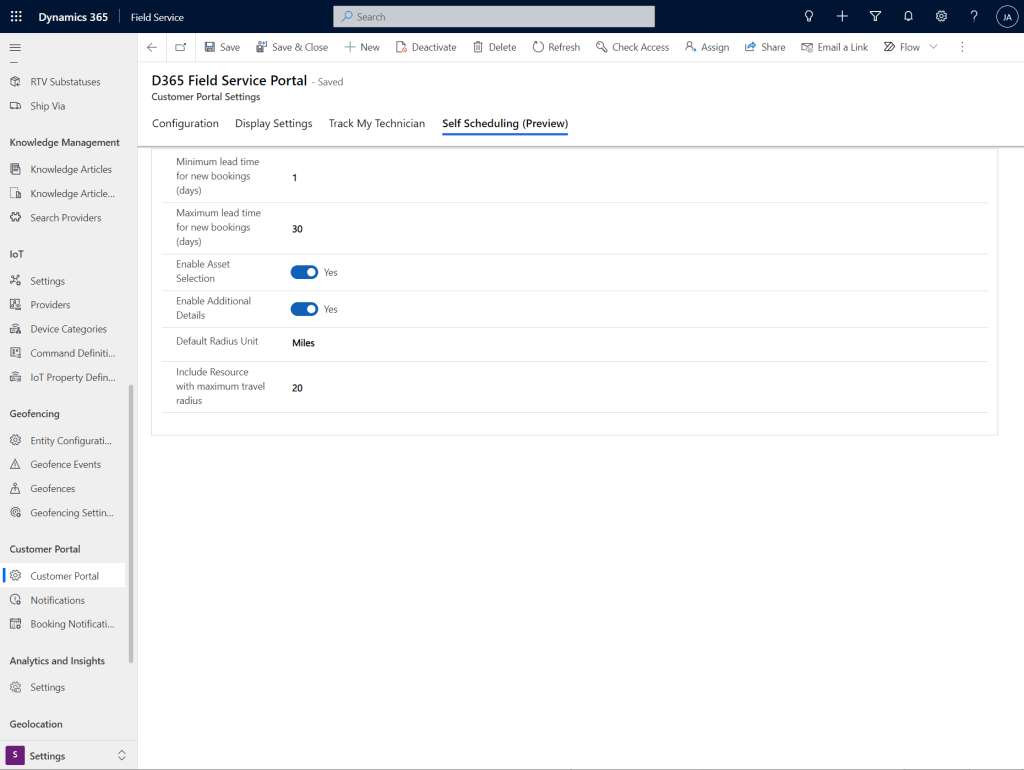
(Self Scheduling) settings
To get the portal (and self scheduling) up and running you need to toggle the following settings:
- On the ‘Configuration’ tab
- Set Self Scheduling to Yes
- Set the ‘Send self-scheduling experience to Account Contacts’ to Yes. You can select ‘Existing and New Contacts’ on the pop-up that appears (in this case)
- The ‘Display Settings’ tab controls the look and feel of the portal. We’ll skip changes to this for now.
- On the ‘Self Scheduling (Preview)’ tab there are a few settings you can choose to toggle depending on your preference
- Enable Asset selection – allows a logged in customer to view and select their ‘Customer Asset’ (via the parent account association on the Asset and Account that the logged in contact belongs to) when scheduling a Work Order. This is handy in principle, but does have some caveats – covered as part of the booking experience
- Resource Radius – Make sure you increase this or have resources within the radius or your scheduling search will return no results. It’s important to note that changing this radius also affects the search radius on the Schedule Board.
Supporting data
The final step in the setup process is to setup the necessary data required to make the portal work:
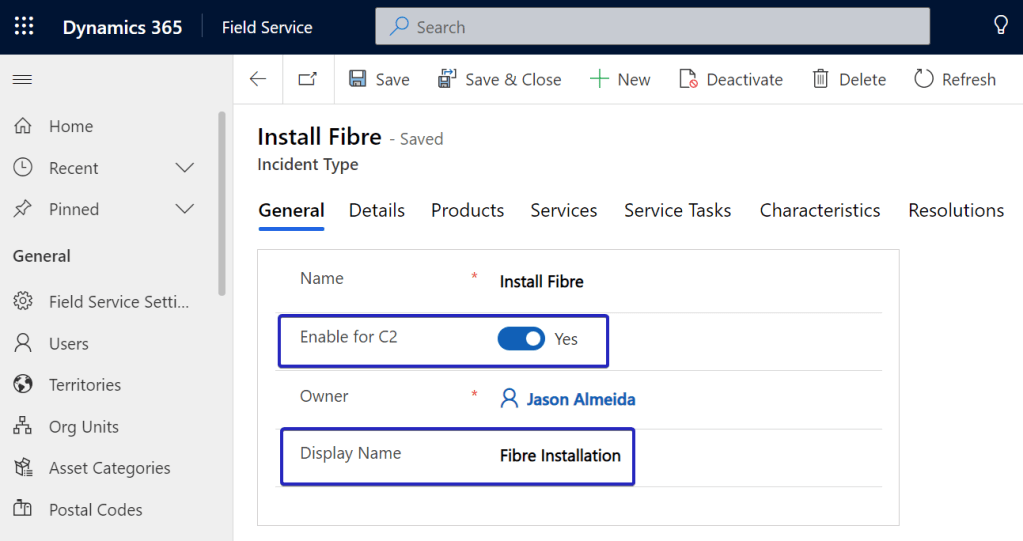
- Incident Types – When a portal user selects a ‘service’ as part of the self scheduling experience, they are picking from a list of Incident Types that have been enabled to be displayed on the portal. This is driven by the ‘Enable for C2’ toggle on the Incident Type record (image below).
Additionally, you will need to set the Estimated Duration, the Default Work Order Type and make sure that the related Work Order has a Default Price List set against it.
You can also set Characteristics, Service Tasks, etc. against the Incident Type.

- Bookable Resources – You will need to setup Bookable Resources of type ‘User’ with the correct location/ address, working hours and characteristics.
- Invite Contact – There are a couple ways to invite Invite Contacts who you want to join the portal –
- Create a New Contact against the Account with Assets. This will automatically send an invitation to the new contact to sign up to the portal
- Manually setup a Contact via the Portal Management App – I use this method as a shortcut, setting the username, enabling the login and setting a password
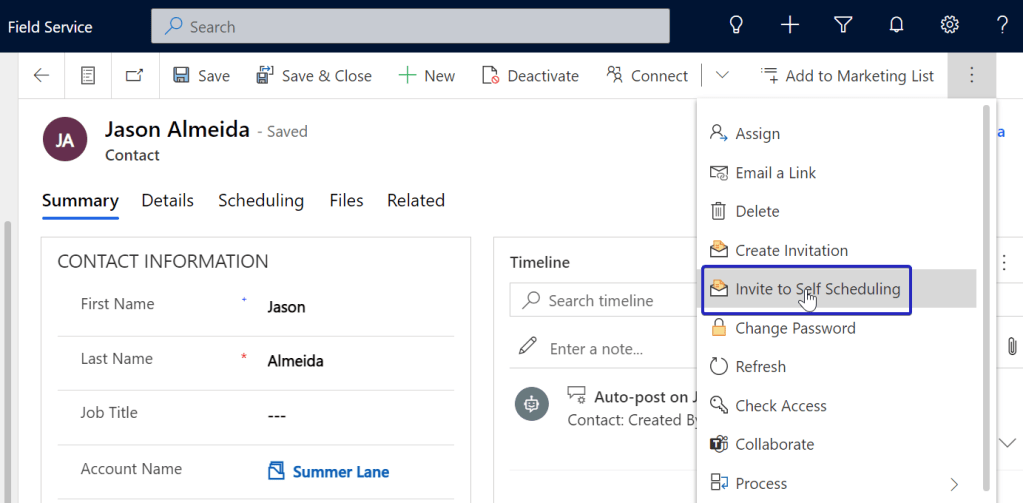
- Send an existing contact an invitation – There is a Command Bar action to send the invite
In all cases, make sure you check that the Contact record as the ‘Web API Users’ Web Role associated – You can check this via the Related entities list.
After these steps, you should have a working portal where an external user can log in and schedule work orders.
The user experience
Homepage experience
As it currently stands, the homepage for the portal is relatively bare (but this will change with one of the wave 2 updates). At the moment (left image) you’re simply presented with a GIANT ‘Schedule Service Now’ link.
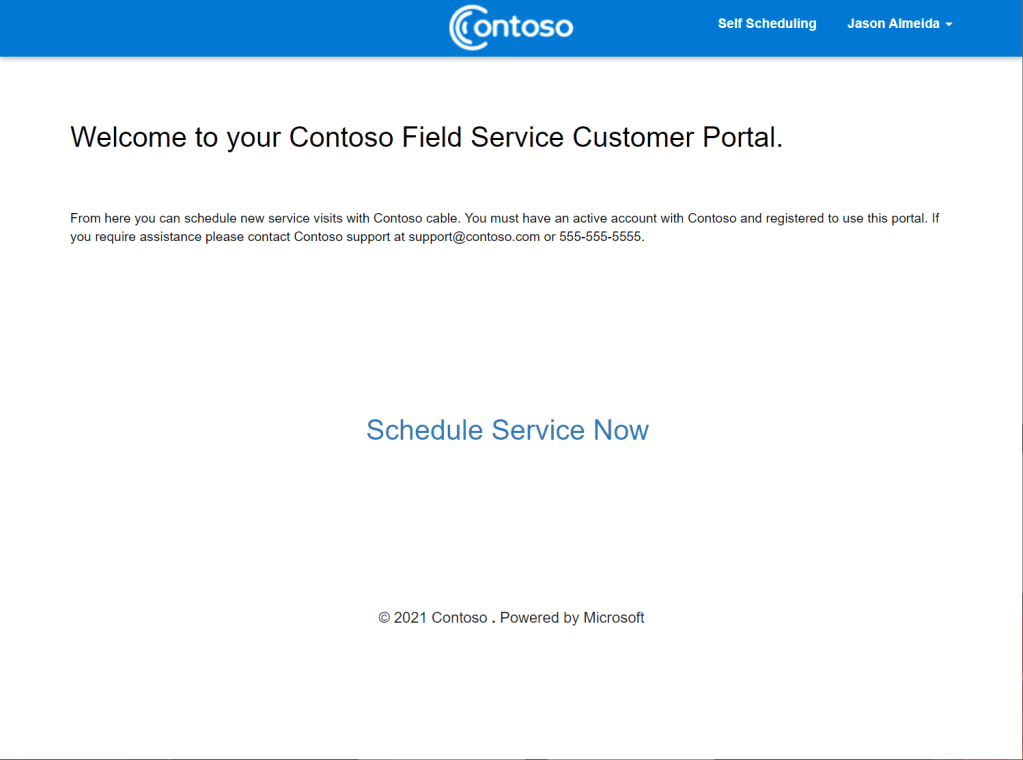
Customer Portal homepage pre-wave 2 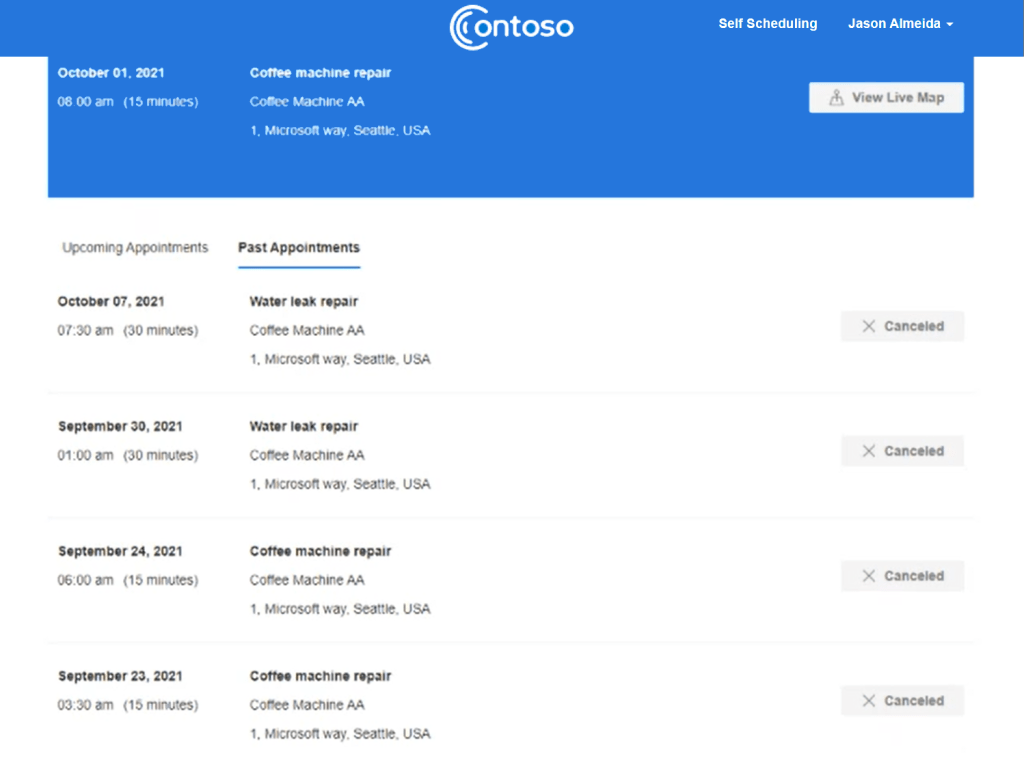
Customer Portal homepage post-wave 2…much better right?
In the new iteration as part of wave 2, the homepages brings some useful additional functionality:
- See your current booking at the top and access the technician tracker
- Access past bookings and actions to provide feedback (via customer voice)
- Access future bookings and actions to reschedule bookings
Booking experience
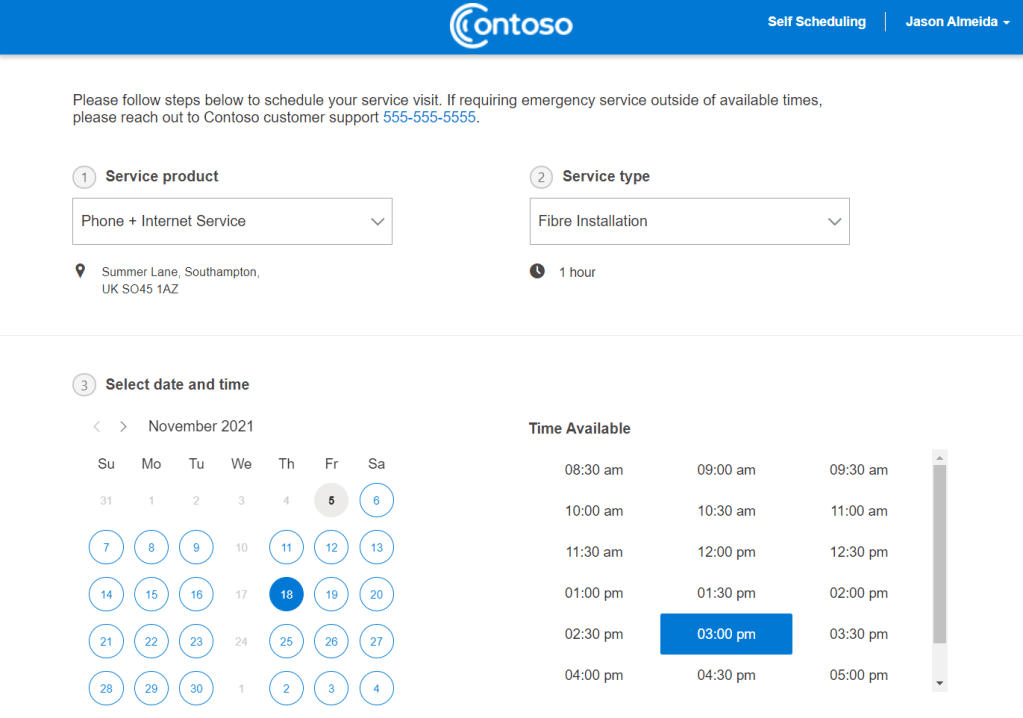
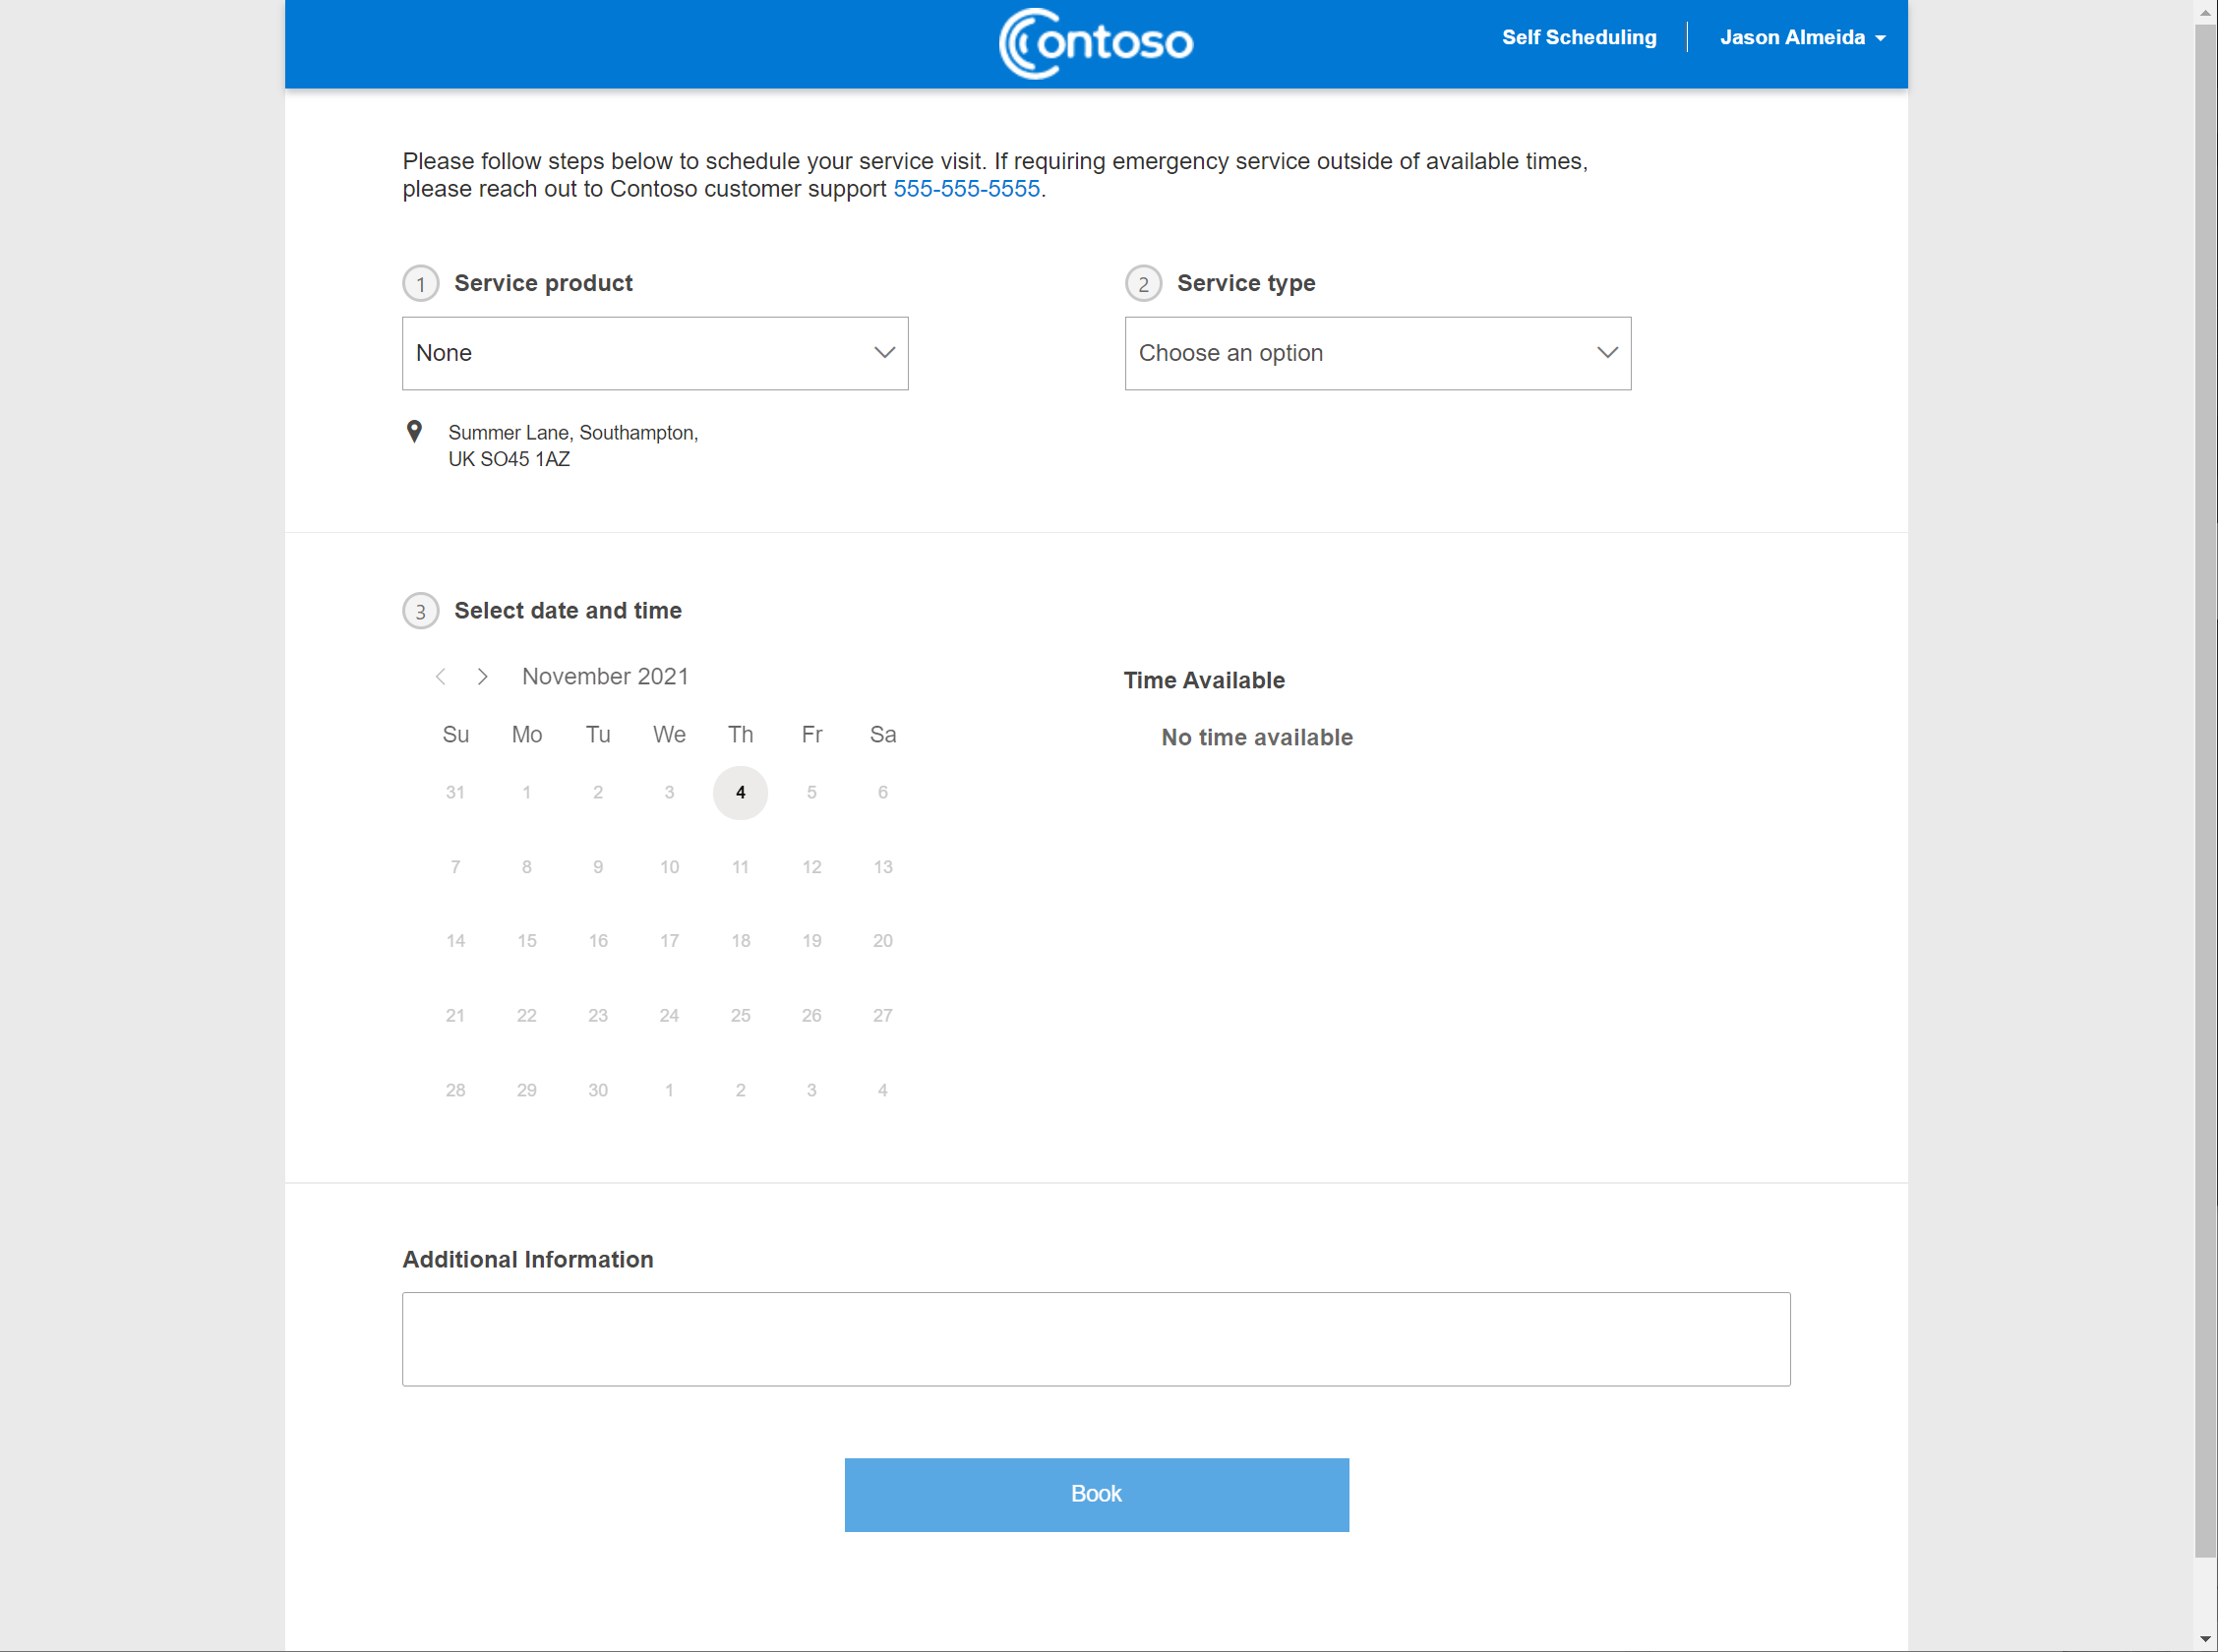
Clicking the Schedule Service Now button (provided you have logged in) takes you to the booking experience with 3 main steps to self schedule:
- Select the Service Product
- Select the Service Type
- Select the Date, then one of the available slots, add additional information, and then click Book.
Thoughts on the booking experience
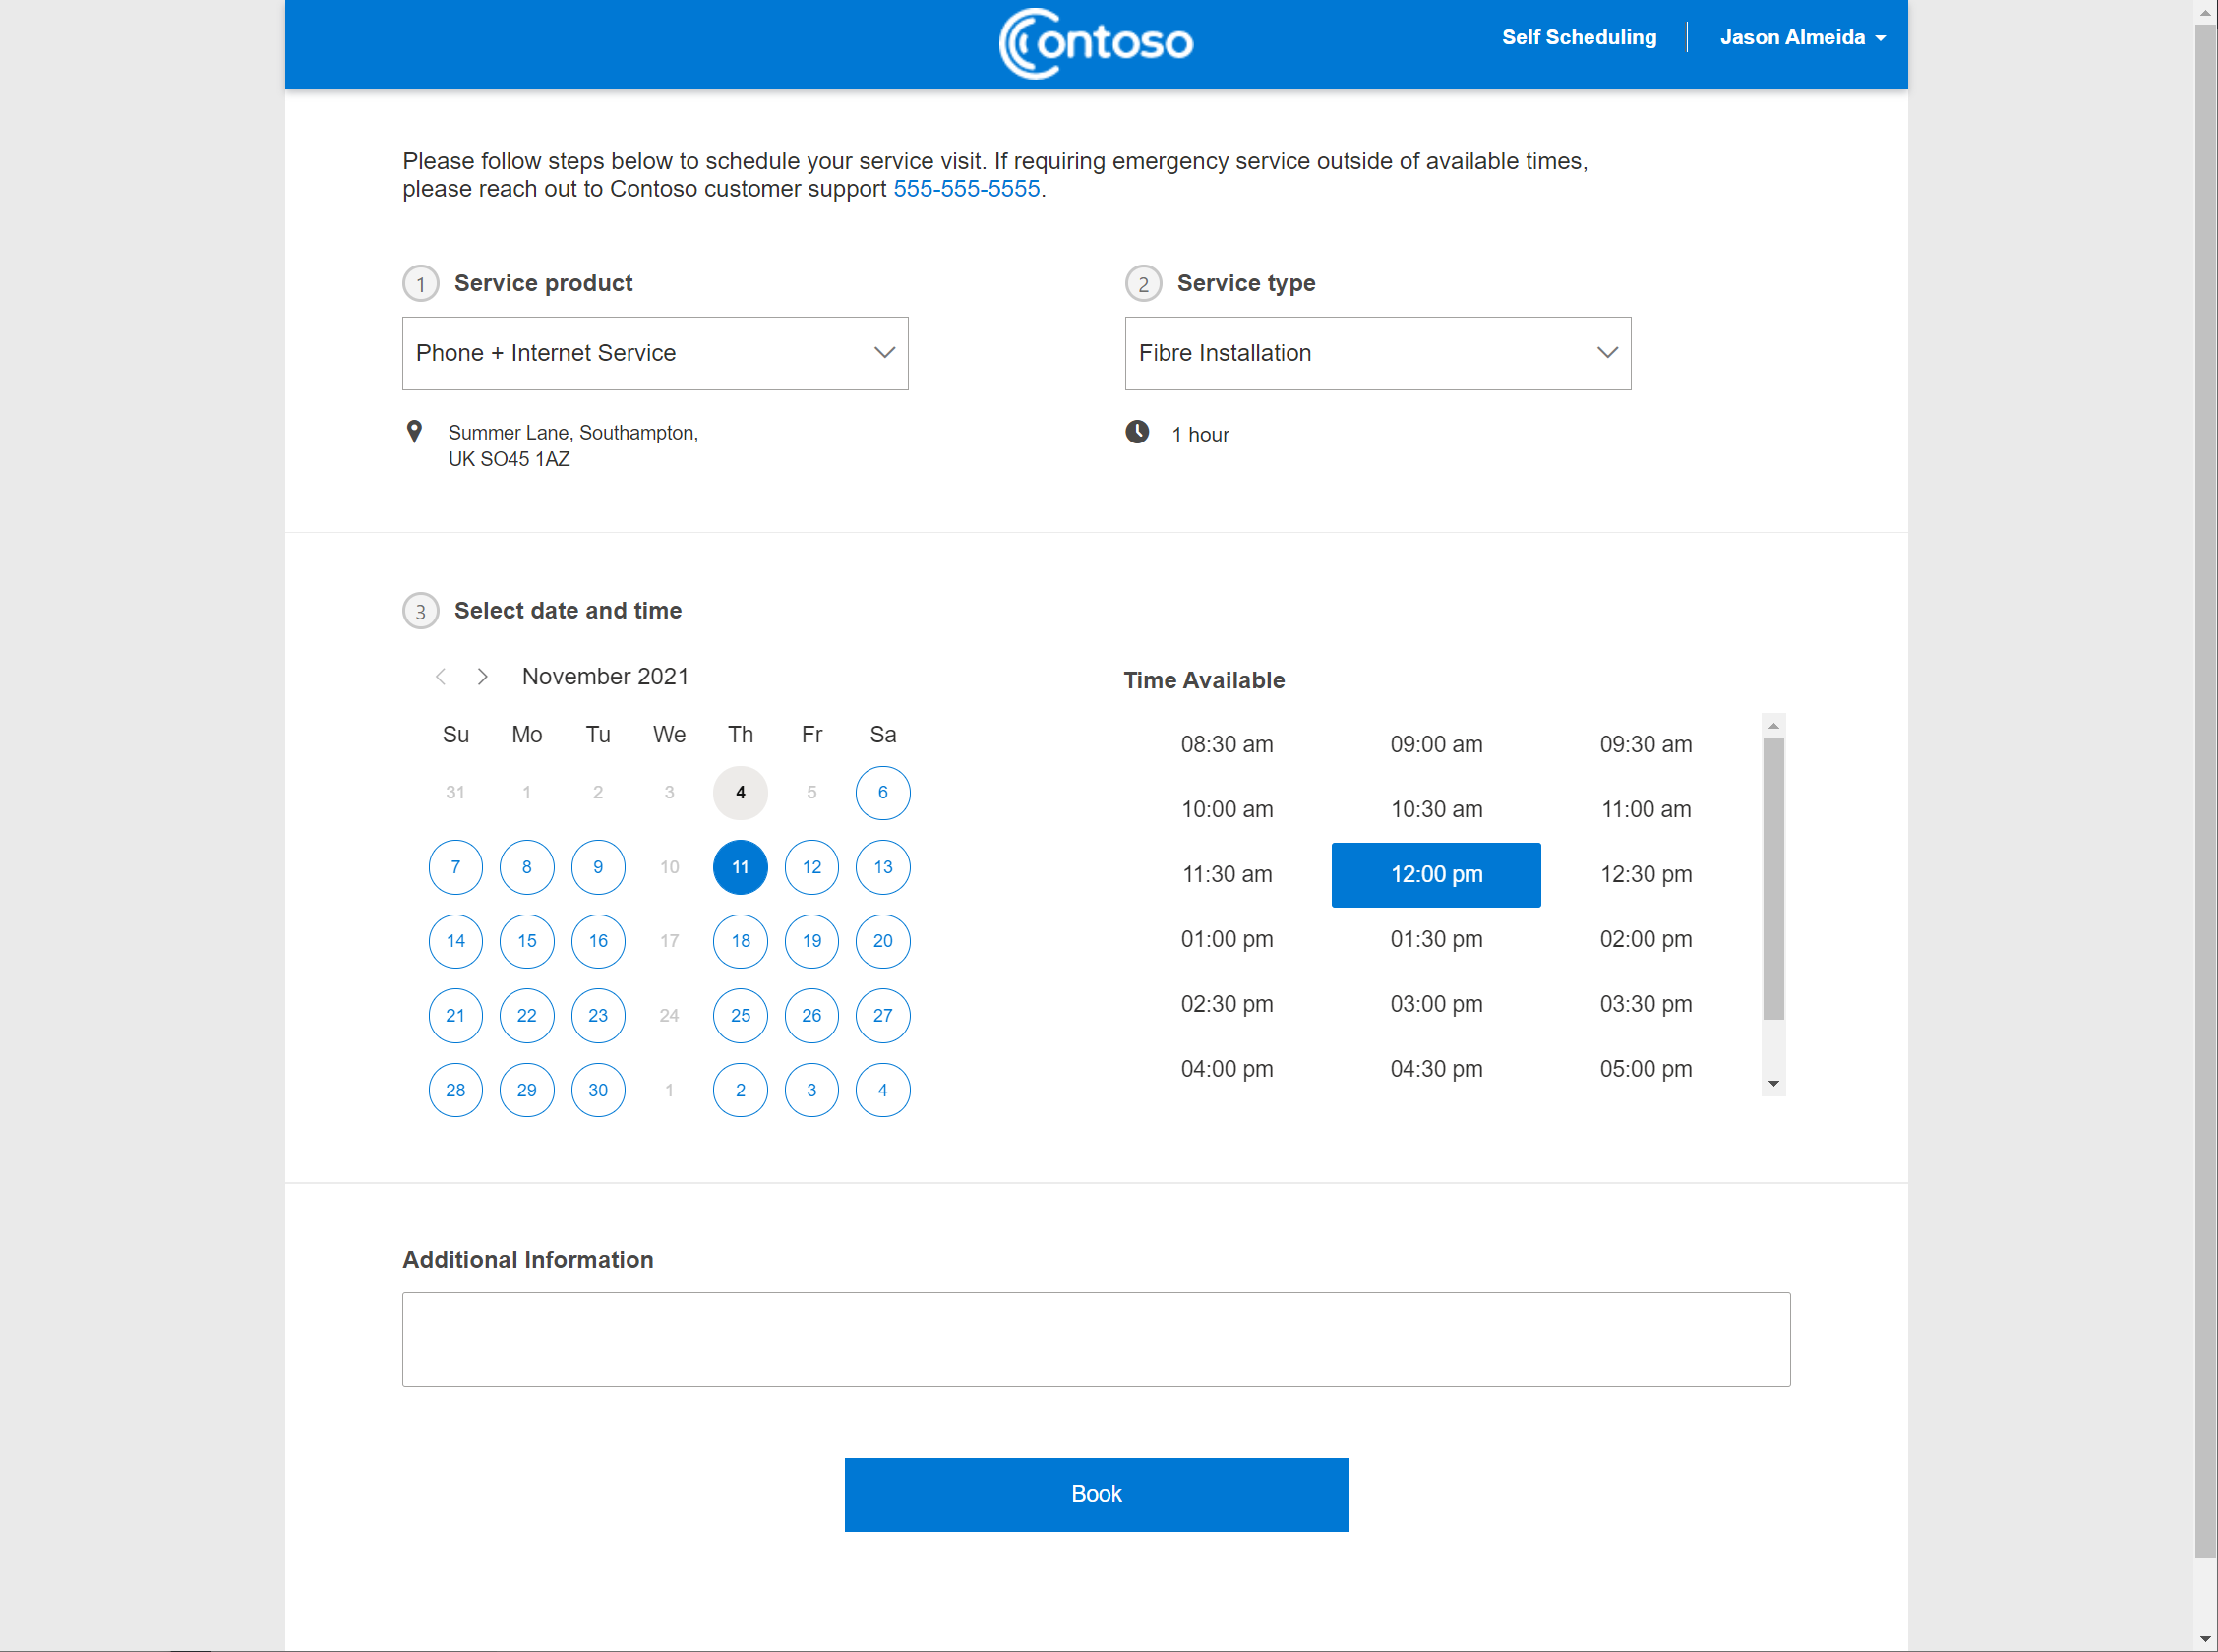
The Service Product dropdown is displayed if ‘Enable Asset Selection’ is set to Yes, BUT, it is an optional field. Users can skip populating this field if they wish and there doesn’t seem to be a way to control whether the fiekd is mandatory or optional.
I have not seen the ablity to filter/limit the serviceable assets that are presented to the logged in contact- for example: you may only want to surface the boiler installed at the customer location and not all the serialised child assets
The dropdown to pick the Service Type is a list of Incident Types where the ‘show on C2’ flag is set to yes. This field is not mandatory, but you need to select an option to complete step 3.
While its great to have these two abilities, I can’t help but think this could result in a disjointed booking experience for the customer and a management hassle for back office staff. The two dropdowns (product and service) are in no way dependent on each other, nor does there seem to be a way to create a dependency between the two. You could end up with a customer selecting the right product and wrong service or vice versa
Ideally I would like to see the available services filtered by the selected customer asset – This could be driven through an intersect (at the asset category level perhaps).
The Service Types surfaced on the portal for the logged in contact takes an all or nothing approach i.e. if the flag on the Incident Type is set to yes, it is displayed on the portal. It would have been great to surface Incident Types based on the logged in customer (or based on the Customer Asset suggestion above). You will need to be mindful of what Incident Types are surfaced on the portal as the ones you choose will be available to all logged in contacts (at least as of today)
At the point that you select a Service Type, the portal makes a real-time call to the Dataverse using the scheduling APIs to retrieve the resources who can cater for the particular request. The scheduling APIs handle the heavy lifting to find the resource with the right skills and availability, in the right location etc. The returned booking slots are displayed at a minimum of 30 min increments. You don’t see the specific resource at this point in time. Also, it’s worth mentioning that this isn’t true slot-based scheduling.
Gotchas/Observations
In addition to my thoughts and observations above, there are a few more gotacha’s to keen in mind if you are considering the use of the FS portal in your solution.
Disjointed Portal Themes
The FS portal has a dramatically different (read: Better) UI and theme in comparison to the existing D365 portal templates. The theme is more modern and in keeping with the Power Apps Portal ‘Blank’ templates based on the Fabric UI.
2 separate portals will have to exist independently
When provisioning the FS portal, it will exist independently from any other Power Apps Portal that you may already have. This includes having a separate website record, portal URL, site settings etc.
You could theoretically ‘integrate’ the two through a simple navigation re-direct along with making sure the themes match up, but the maintenance overhead will continue to exist.
Self-Scheduling applies to User resources only
When a portal user goes through the self scheduling experience, the returned results of available resources is limited to ‘User’ Resources only. So if you have Contact or Equipment resources, you can’t benefit from the self scheduling capabilities just yet. Additionally, self scheduling is not available for crews, pools and multiple resources.
Locked down pages
Key FS portal web pages such as the ‘self scheduling’ and track my technician pages are built using Web Templates based on custom aspx pages managed by Microsoft. So if you want to implement custom frontend logic on the page, there doesn’t seem to be a way to do so (at least at an initial glance).
Summary
The FS portal is an excellent start to provide customers with a self-serve capability within the field service context. At the moment it has a fairly specific use case of allowing a customer to self schedule from a set of services without the confusion of selecting the right product. However, you can see where the product can be improved to make it more usable in the long run. It is after all, still in preview.
